Remember the post about laundry on the line in winter? This is the sweater I reconstructed for my sweetheart as a Valentine’s Day gift using recycled wool sweaters. He’s been gifting me wool sweaters whenever he finds them. He’d given me the grey, ribbed, Henley sweater then mentioned that he liked it and should have kept it. Sadly I’d already felted it and it had become far too small even for me. The patterned sweater was a dated but love-worn sweater of his that had become too worn out to wear. So the challenge was on for me to construct a masculine sweater out of the two sweaters. And…he liked it. Yay! Sewing success for my first reconstructed man’s garment.
Whether you want to display a collection of vintage jewelry or you just hate to hide your favorite pieces while you’re not wearing them, this jewelry frame may be your answer! Made from an old picture frame and a few other supplies, it’s a project that will have you sorting through your treasures to choose just the right pieces to liven your walls.
Supplies:
Open-backed picture frame
Fabric
Two layers of batting, or an old towel (padding)
Foam core board or corrugated cardboard (backing)
Painter’s tape
Hot glue gun
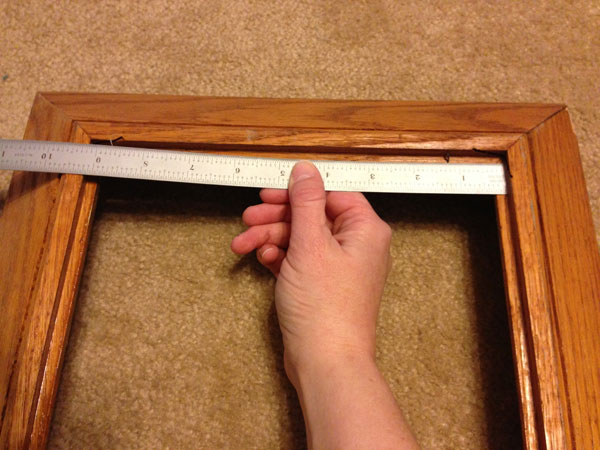
Find an open-backed picture frame. This one was of the highest quality, purchased at great expense… Nah, I’m just messing with you. I bought this one for a dollar at an estate sale. You can use one meant to hold photos if it has a hefty ridge where the back and the glass would go.
Measure the back of the frame to determine what size your backing should be. If you are using a photo frame, you can measure the glass that you will be discarding.
Cut your backing 1/8″ smaller than the size you measured.
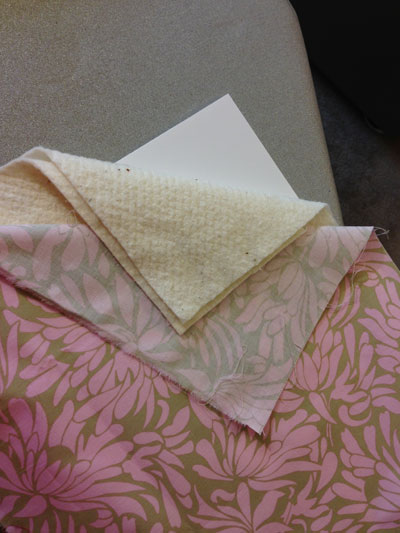
Cut your padding and fabric at least two inches larger than your backing.
A note on choosing fabric – avoid high-contrast prints; these can camouflage your jewelry instead of showcasing it. Also avoid directional prints, or anything that may be difficult to align inside the frame. Audition any possible fabric by laying your jewelry on top of it, then taking a photo of it. You will be able to see in the photo whether the jewelry will stand out, or whether it will blend in.
Place your fabric face down on the table, then layer your padding and your backing on top. Wrap the padding and fabric around to the back of the board, tacking it in place with painter’s tape. (This photo shows the exact opposite of what you should do.)
Press your assembly into the frame. It should be snug. Remove the painter’s tape.
Gently tug at the batting from the back to remove any wrinkles or lumps from the front of your assembly. Once it is smooth, do the same with your fabric until you are satisfied with the way your frame looks.
Trim the batting close to the board edge, being careful not to cut your fabric.
Hot glue the fabric edges onto your backing.
Congratulations! You’re finished!
When attaching brooches to your frame, try not to stick them into the backing board. Brooches (especially vintage ones) can be fragile, and this can sometimes be too much for them.
Stick a sewing pin into the board from which to hang necklaces, if you wish.
Today I’m showing some love for the incredible artist, Christophe Thockler, who created the beautiful stop-motion animation video for the Black Books song, “Favorite Place”.
The video, which features hundreds of spools of thread, hundreds of needles and pins, and the ripping of thousands of embroidery stitches, has quickly been making the rounds on Facebook and various Internet sewing lists, enticing an audience that the Black Books probably never thought to court.
Really there is a purpose to clothes on the line in February: I’m on a mission to remove The Big Stink.
(If you want to skip the back-story and find out the best method for removing The Big Stink, skip to paragraph five.)
I had to quit my job a year ago because the office I worked in was moved to an unhealthy building. Believing that my employer would help me (duh) and well…you know…job, I didn’t quit soon enough and now have a chronic illness that makes it impossible to be out in a world full of synthetic chemicals and poorly maintained and designed HVAC systems without becoming ill. A word of advice: If your work environment is causing health issues for you and your employer doesn’t jump on top of helping you right away, they’re not going to help you. Save yourself. Don’t go to work. Call in sick. Get out now.
What you see here is the first steps in an effort to create an income for myself by deconstructing used clothing and reconstructing it into original designs so that I can work from home. Yard sale season is over so this clothing came from Goodwill. Goodwill and most of the big, charitable resale shops spray their clothing with the synthetic chemical concoction that causes so many people health issues: Febreze.
It “works” by encapsulating odors. It doesn’t actually remove them so whatever is causing the odor is still there. Plus it doesn’t really work. Whatever it’s sprayed with just smells like heinous, chemical fragrance AND stench. Does anyone even believe in this stuff? Mention the name anywhere and it seems the response is always, “It gives me a headache,” or “It makes me cough.” SIGH. If I leave anything sprayed with it in my home for any period of time, it lays me up for a month (I learned this the hard way.). I’ll spare you the entire list of symptoms, but one involves a burning rash on my face and the skin on my lips peeling off. Yes, it literally burns the skin off of my face.
I’ve tried every canary-safe method imaginable to remove this stench from clothing. It’s particularly difficult to get out of wool. Do a Web-search on the topic, and you will find entire threads dedicated to the effort of removing this…er, “stuff” from clothing. The most-touted recommendation is to dispose of the contaminated item entirely.
I’ve washed the clothing three times in the washing machine: still stinks to high-Heaven. Washed with Sal Suds, Murphy’s Oil, vinegar: Still stinks. Soak in vinegar, Citrasolv, Murphy’s Oil, dish soap: Still stinks. Dry on high: Still stinks. Wash and hang on the clothesline for a week: Still stinks. Worse yet, it still makes me sick! Once I manage to start to break through the The Big Stink, there’s still the perfume and laundry detergent that the previous owner coated it with to deal with. I’m sure Proctor & Gamble is very pleased that their product is so pervasive…but…for the LOVE OF PETE, please have mercy on the canaries of the world.
Hanging the clothing on the line for a week combined with washing in the machine with Sal Suds or Murphy’s Oil (if you can tolerate the pervasive smell of this) is the best method for foiling this evil, stinking beast. I speculated that sunshine and wind might be the key. However, I find the freezing temperatures and precipitation of winter are the best method. I’m now speculating whether or not putting the clothing in the household freezer might work but am not brave enough to try it. After all, one shirt sprayed with this evil stinking beast can contaminate an entire house. I’d hate to have the place I store my food invaded by this, er…product.
Here is a list of odor removal methods that are cheaper and actually take the odor away instead of just covering it up with toxic, synthetic chemicals.
SAFER ODOR REMOVAL METHODS:
Fresh air and sunshine
White vinegar in a spray bottle (smells like a salad at first but the vinegar smell will go away)
Essential oils in water (and/or vinegar) in a spray bottle. My favorite smell is lavender, but tea tree, lemon, orange and Thieves are also good choices. You can blend these to make your own fragrance. If you’re trying to decontaminate something, I think Thieves would be the best choice. Note: Some sensitive people are made sick by the VOCs in essential oils so don’t get crazy with spreading smells all over the place.
Smells Begone. An enzymatic odor eliminator with no added fragrance.
Wash it with water and a safer soap like Sal Suds. Water is the most powerful solvent on Earth! Go water!!
To learn more about what common products are safe (or unsafe), visit the EWG website. Unfortunately they only analyze the individual chemicals. They don’t analyze the toxicity of the chemicals combined. Many products have over a hundred synthetic chemicals in them. Regulations are slim or non-existent and the manufacturers don’t have to tell you what is in their products.
Back in the day, when it was cool to be on AOL, my handle was OLuckyMe. I no longer have the handle, but I am, indeed, very lucky.
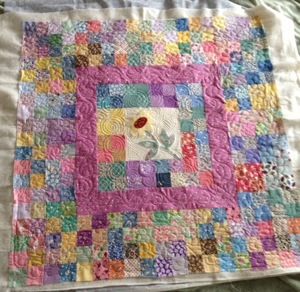
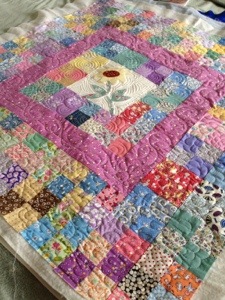
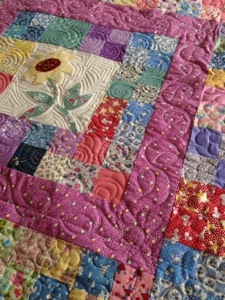
Don’t worry; this is not one of those long, gratuitous gratitude posts. It’s just my way of saying how fortunate I feel to be able to do longarm work on charity quilts. I am excited to share a couple of quilts that I was lucky enough to finish for The Trinity Valley Quilters’ Guild.
This sweet quilt is going to make some little girl very happy!
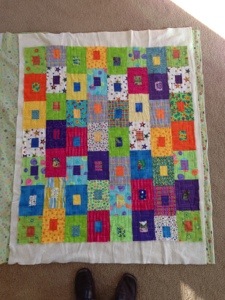
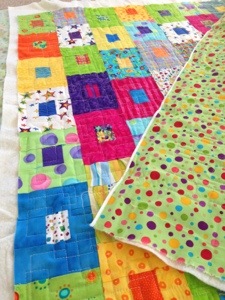
And this bright little quilt has the neatest backing! I think this one is made from the “Snaps” pattern by Amy Walsh, from the book, Colorful Quilts for Fabric Lovers.
I had so much fun finishing these cheerful quilts that I can’t wait until the next batch shows up!
2. Line baking sheets with parchment paper (I needed two)
3. Separate whites from yolks
4. Beat egg whites on low until foamy; continue on high until stiff peaks form (You should be able to turn the bowl on its side without the whites moving.
5. Add sugar to egg whites a little at a time while continuing to beat on high.
6. Add spices and cocoa all at once and fold in by hand (Fold in fully but don’t worry about streaks of cocoa).
7. Pipe or drop (by small spoonfuls) the mixture onto the baking sheets and bake for 60-90 minutes.
8. Turn off oven and leave meringues inside with the door shut overnight (I left them for an hour and they were fine)
9. Remove from baking sheets and store in an airtight container (This is important)
NOTES:
I’m famous for my inability to exactly follow directions, er…, recipes as well as for my ability to combine four similar recipes into one. This recipe is no different. This stems from a need to cook with ingredients I have on hand because there’s no way I’m making a trip to the store for just a few ingredients. I developed this recipe using the Chocolaty Meringue Stars recipe from “Betty Crocker’s New Choices Cookbook” and Debby Lovell’s Chai Meringues recipe from “Chai: The Spice of India” and, of course, the creative process unique to…me.
I honestly can’t remember how much cocoa I used because I didn’t write it down (OK. I do this a lot too.) but I’m pretty sure it was a tablespoon. But…you can never have too much chocolate, right? I’m also pretty sure I added a teaspoon of vanilla (Do this at the beginning of the beating process. (No doubt I had good intentions of following a single, only-slightly-altered recipe for once when I started out.)). Why don’t I know exact measurements? Because I add a little until it smells right. Tip: use your sense of smell when cooking. It often tells you how much and what to add.
There are lots of tips for making meringues that make them seem kind of picky and maybe a little difficult to make. I didn’t know any of them until today when I researched making meringues online. I wanted to find out how little sugar I could get away with (My recipe is a little too sweet for my tastes.). Sugar is a necessary ingredient and the recommendation is for no less than two tablespoons per egg. At any rate, I’ve made the Chocolaty Meringue Stars recipe quite a bit and they have always turned out well. It is, however, really important that you let your meringues rest in the oven and you must put them in an airtight container as soon as you take them out of the oven. You’re basically just dehydrating the fluffed-up egg whites so my guess is that if the meringues got a little soggy, you could put them in the oven on low for a bit to fix them up. Here are more tips if you are interested:
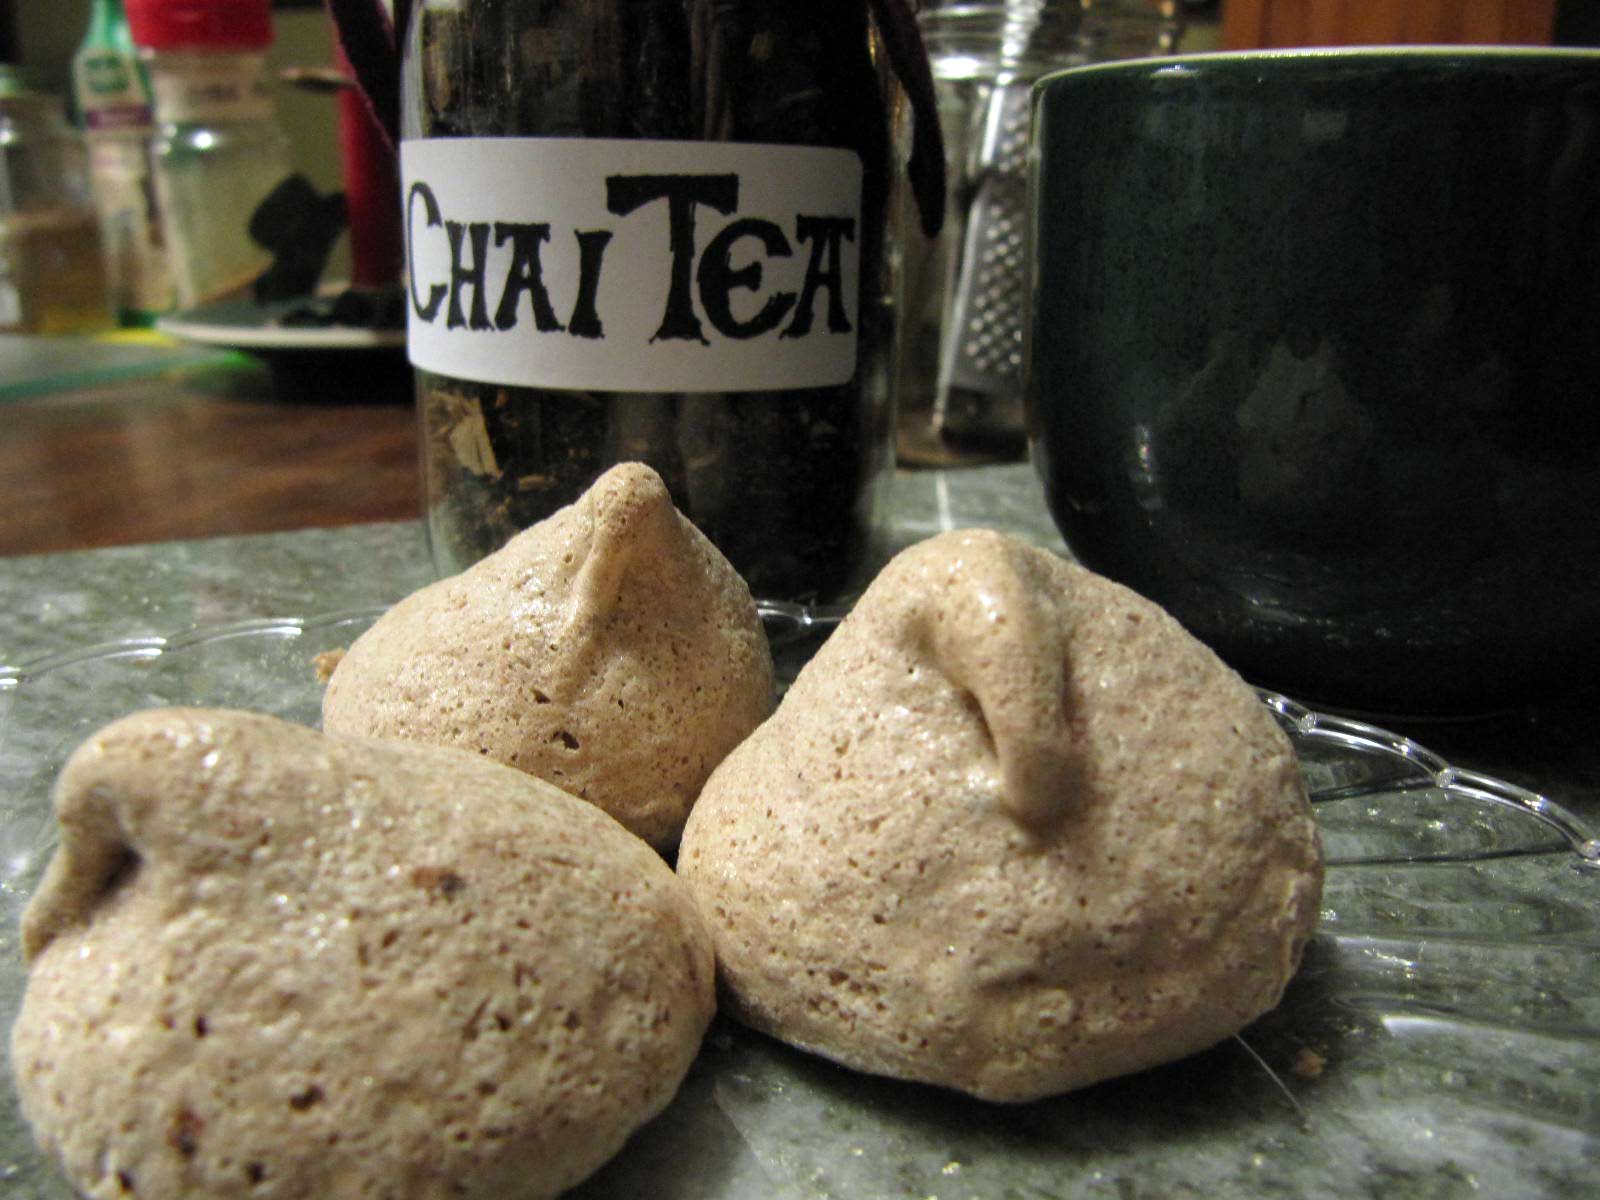
The smell is overwhelmingly divine. Absolutely unbelievable. Try not to eat all of the mixture before you bake it. Yeah, really, it’s going to be hard not to eat raw egg. I used a plastic sandwich bag with the corner clipped off to squeeze the meringue onto the baking sheets. You can bake them for as little as 30 minutes but they will be chewy inside. I baked them for 60 minutes and let them set in the oven for another hour before my perfectly crispy, perfectly spiced meringues were whisked away to a birthday celebration.
Want to make these even more delicious? Eat them with my Chai Tea.
I find that ready-made chai tea is too light on spices for my tastes so I developed my own blend from spices I had on-hand. Feel free to experiment with combinations.
INGREDIENTS:
9T Black Tea
1t Vanilla Extract
1″ X 3/4″ grated ginger slice (1t Ground Ginger)
1t Ground Cardamom
2t Cocoa Nibs
3 pinches Dried Lemon (or Orange or Tangerine) Zest
1t Whole Cloves
3/4 – 1 t Nutmeg fresh-ground
2-3 Cinammon Sticks
1t Pepper Corns
12 Allspice Seeds
3/4t Coriander Seeds
1 – 2 Star Anise
3 Bay Leaves
3/4t Fennel Seeds
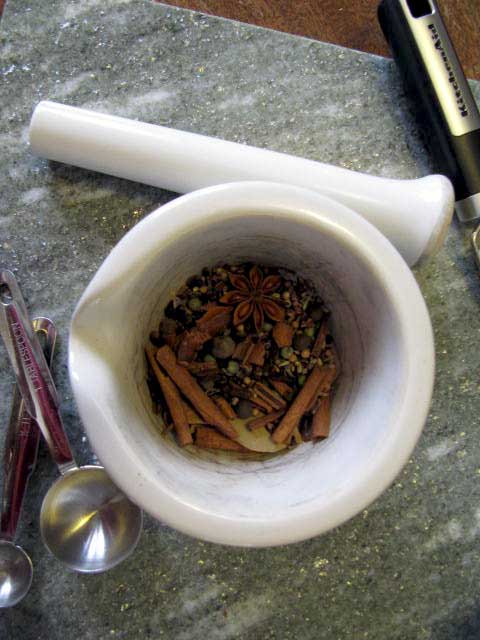
DIRECTIONS: Mound black tea in bowl large enough to accommodate all ingredients. Measure vanilla and pour on top of black tea. Measure out fresh-grated ginger (or ground ginger), ground cardamom, cocoa nibs and dried lemon (or orange or tangerine) zest and place in bowl with black tea. Place remaining ingredients in mortar and pestle and smash to smaller bits. Pour into bowl with black tea and combine thoroughly. Place in jar and label. Use one teaspoon of tea per one cup of boiled water.
NOTES: Chai can pretty much be made from any combination of the above spices. If you don’t have a spice or it’s hard to get, leave it out and add more of another spice. Be careful with the cloves and cardamom. They have a strong flavor. You could replace the liquid vanilla with the rind (pod?) of a vanilla bean. Ground spices can be replaced with whole. Whole can be replaced with ground. If you don’t have a mortar and pestle, get creative: Use a mason jar to smash it on your cutting board; use a hammer. Experiment with smaller batches until you get the combination just the way you like it. Enjoy!!
If you’ve made even one quilt, you have narrow strips of batting. Sometimes they’re just shy of the size you need for a wall hanging, purse, or anything else.
WHAT TO DO?
You can join these pieces of batting together without lumps or flat spots, using your handy dandy sewing machine!
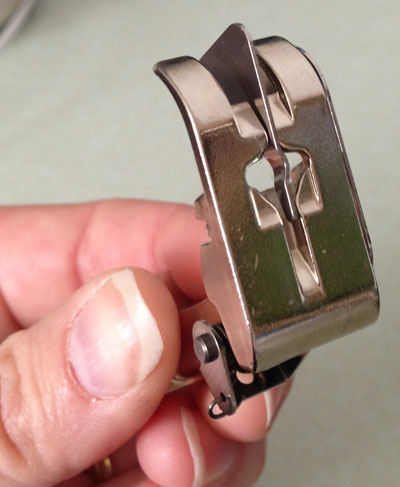
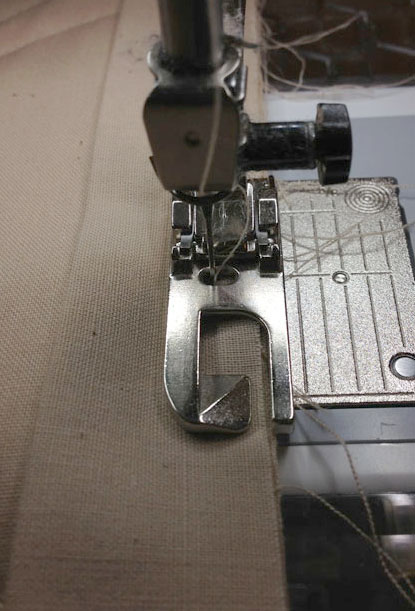
For this tutorial, you need a sewing machine that does a zig-zag stitch, and an edge joining (or stitch in the ditch) foot. If your machine is a Bernina, this is foot number five. They call it the blind hem foot. What’s important about this foot is the blade running down the middle of the foot. This is what will help us join our batting pieces.
1. Trim your batting pieces so that they are straight and even. Note that most batting has two different sides. Keep the like sides facing up to ensure that your batting will behave consistently during quilting and washing.
2. Adjust your machine stitch to zig-zag as wide as your foot will allow, and as long as your machine will allow. This will make a very loose stitch.
3. Place the two pieces of batting side by side, meeting at the blade in the center of the foot, and zig-zag the pieces together. They should not overlap! If your stitches are too tight, loosen your top tension to keep them from bunching the batting together or compressing it.
Your stitches will usually not be very attractive or sturdy, but that is okay. All we want is to help these batting pieces stay put until we are done basting and quilting. This should be enough.
If you try this, let me know how it works for you!
I hate binding quilts. It’s the one thing about quilting that feels like drudgery to me. It takes a long time to do it the traditional way, and it is difficult to get great results if you do it all by machine.
Let’s start with the traditional method of binding a quilt:
Cut and join the binding.
Fold the binding in half, lengthwise.
Sew the binding to the front of the quilt, matching the raw edge of the binding to the raw edge of the quilt.
Hand-sew the other edge of the binding to the back of the quilt, effectively encasing the raw edge underneath two layers of fabric.
For those of us who do not like or do not have the time to hand sew quilt bindings, there are machine methods.
Follow steps one through three above.
Fold the binding to the back of the quilt and pin in place.
Stitch in the ditch next to the binding on the top of the quilt to secure binding to the back.
The problem with this method is that it generally creates an uneven stitching line on the back. You can’t see what’s going on underneath your quilt, so you’re at the mercy of the pinning job you may have gotten correct, or not. (Usually not.)
I tried using my bias tape foot, but that did not work well. The traditional binder foot is made to handle narrow bindings on thin fabric. I’ve tried feeding even a light quilt sandwich through there, and I got a mess.
The Search
I figured there must be a better way, so I asked Dr. Google.
I discovered that there are actual machine binding accessories, often used in industrial settings. These function similar to the traditional binding foot, except that they are made to handle much wider binding, and to put much heavier fabric through the machine.
Bernina makes a binding attachment similar to the industrial binders for their domestic machines that works like a champ, but it does not bind the quilt in a traditional way. Instead, it applies the binding similar to bias tape: you have two layers of fabric on the top, two on the bottom, and only one on the edge, where your quilt receives the most wear. It’s expensive, too. Topping out at around $300 for the whole package, I couldn’t justify the purchase. I admit to some sour grapes in my assessment of the product.
Still, I thought, there must be some better way to do this.
The Idea
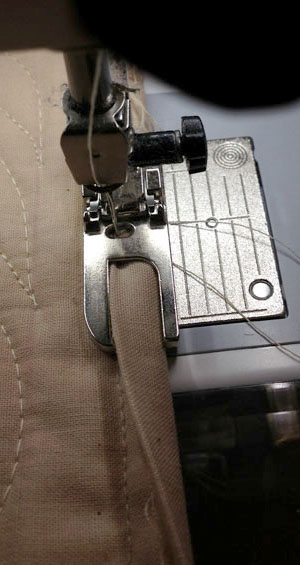
Enter the Flat Fell Foot.
We see the product of this little device pretty much every day. It’s used to make those encased seams on our jeans, among other things. Here is a link to a video about how to use a flat fell foot, courtesy of Heirloom Creations.
When I saw this video, the light bulb went on. The job of the flat fell foot is to turn fabric over so you can stitch it precisely. That, my friends, is exactly what we want to do when binding a quilt!
Flat fell feet come in different widths. For quilt binding, you need a large one. Mine is 8mm.
As you can see from the photos, there are other features that make the flat fell foot well-suited to quilt binding. The foot bottom has three different levels. The right-most level is the lowest, and is meant to ride on a single layer of fabric. The center level is highest. This keeps your folded fabric in place. The left-most level is meant to ride on two layers of fabric. These levels are what will keep our quilt in place.
Now, on to the part you’ve been waiting for:
The Tutorial
This is not a “quick” way to bind, but it is an easier way to get a quality binding on your quilt.
These instructions are for binding a quilt with a low loft batting, such as Warm & Natural. I haven’t tested this method on thicker battings, but I would assume that you would need to cut your binding slightly wider to accommodate the extra thickness.
Trim all the layers of your quilt. If you do not have quilting up to the edge, you may want to do a stay stitch around the outside edge to make sure everything stays straight and square. This is a precision binding technique.
Make your binding. For this method, I cut my binding at TWO INCHES. Please trust me on this. If you cut it too wide, it will not work properly. You may use either bias binding or straight cut binding.
When joining your binding, join the ends at an angle to reduce bulk.
Press your binding in half lengthwise, so you have a one inch strip.
Set your machine needle as far left as the flat fell foot will allow.
Sew the binding to the top of the quilt with the raw edges facing the right side, using the flat fell foot to guide the edge of the quilt and binding. Everything will be underneath the flat fell foot at this point.
To turn corners, stop ¼” away from the corner, back stitch, and remove the quilt from the machine. Fold your binding to the right, forming a triangle over the stitching. Then fold the binding back to the left, lining it up with the next side of the quilt. Pin.
Sew the next side, starting from the edge.
Continue like this until you have sewn the binding completely to the front of the quilt.
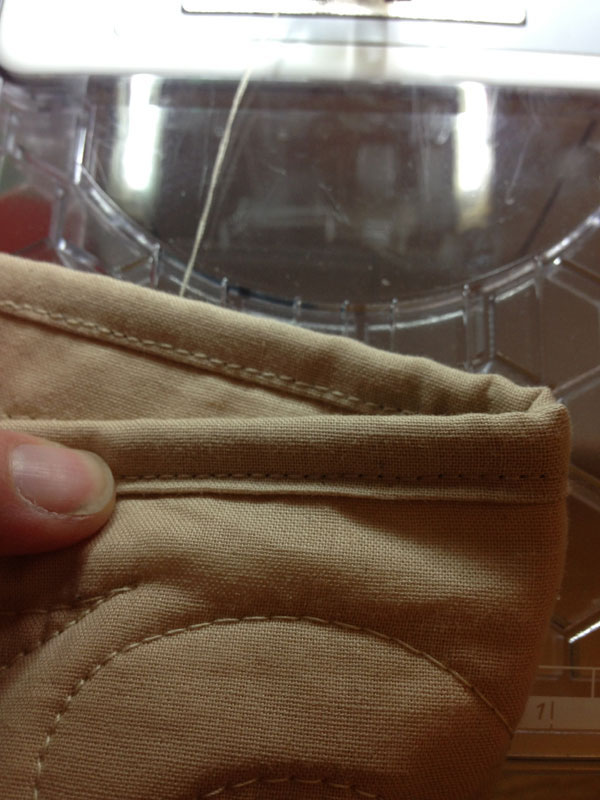
Press your binding to the outside of the quilt.
Move your needle slightly to the right. (I move mine two positions.)
This is where the magic happens. Working from the back side of the quilt, fold a portion of the binding over and put your needle down into all the layers.
Lift your presser foot, with the needle still down, and pull the edge of the binding up so that it lies above the small inner edge of your flat fell foot. The right edge of your flat fell foot will be resting on the machine bed.
Lower your presser foot and sew, making sure to keep your fabric against the inner edge of the flat fell foot, and gently folding the binding as it goes toward the foot.
When you near a corner, fold the binding of the oncoming side up and pin in place. Stitch up to the corner, adjusting the binding in the binding foot to make sure it stays in place. Use a stiletto or a seam ripper if you have to. If you prefer to avoid this, you can also pin both sides of the binding in place, then place all layers of the quilt and binding underneath the foot as you sew to the corner.
Once you reach the binding on the next corner, keep your needle down and rotate the quilt to sew the next edge. All the quilt layers, including the binding, will be under your foot at this point. Sew a few stitches and then, needle down, lift the presser foot and bring the binding up over the top of it again so that you can continue the way you did in step 12.
When you reach the end of your binding, simply lift your foot, pull the binding underneath, and sew until the end.
When you’re finished, you should have a beautiful binding with no hand sewing.
Happy Binding, and let me know how this turns out for you!


 Everything About Wool Felting