
The Problem
I hate binding quilts. It’s the one thing about quilting that feels like drudgery to me. It takes a long time to do it the traditional way, and it is difficult to get great results if you do it all by machine.
Let’s start with the traditional method of binding a quilt:
- Cut and join the binding.
- Fold the binding in half, lengthwise.
- Sew the binding to the front of the quilt, matching the raw edge of the binding to the raw edge of the quilt.
- Hand-sew the other edge of the binding to the back of the quilt, effectively encasing the raw edge underneath two layers of fabric.
For those of us who do not like or do not have the time to hand sew quilt bindings, there are machine methods.
- Follow steps one through three above.
- Fold the binding to the back of the quilt and pin in place.
- Stitch in the ditch next to the binding on the top of the quilt to secure binding to the back.
The problem with this method is that it generally creates an uneven stitching line on the back. You can’t see what’s going on underneath your quilt, so you’re at the mercy of the pinning job you may have gotten correct, or not. (Usually not.)
I tried using my bias tape foot, but that did not work well. The traditional binder foot is made to handle narrow bindings on thin fabric. I’ve tried feeding even a light quilt sandwich through there, and I got a mess.
The Search
I figured there must be a better way, so I asked Dr. Google.
I discovered that there are actual machine binding accessories, often used in industrial settings. These function similar to the traditional binding foot, except that they are made to handle much wider binding, and to put much heavier fabric through the machine.
Bernina makes a binding attachment similar to the industrial binders for their domestic machines that works like a champ, but it does not bind the quilt in a traditional way. Instead, it applies the binding similar to bias tape: you have two layers of fabric on the top, two on the bottom, and only one on the edge, where your quilt receives the most wear. It’s expensive, too. Topping out at around $300 for the whole package, I couldn’t justify the purchase. I admit to some sour grapes in my assessment of the product.
Still, I thought, there must be some better way to do this.
The Idea
Enter the Flat Fell Foot.
We see the product of this little device pretty much every day. It’s used to make those encased seams on our jeans, among other things. Here is a link to a video about how to use a flat fell foot, courtesy of Heirloom Creations.
When I saw this video, the light bulb went on. The job of the flat fell foot is to turn fabric over so you can stitch it precisely. That, my friends, is exactly what we want to do when binding a quilt!
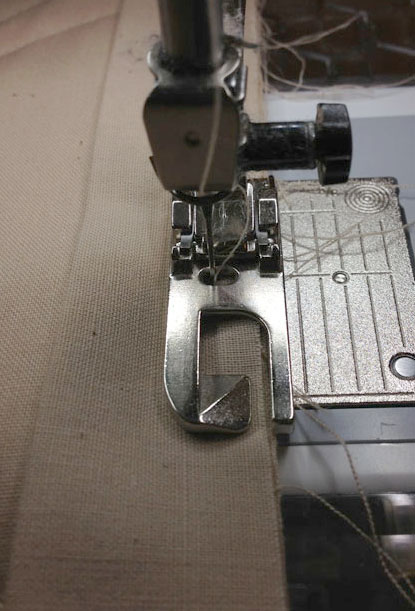
Flat fell feet come in different widths. For quilt binding, you need a large one. Mine is 8mm.


As you can see from the photos, there are other features that make the flat fell foot well-suited to quilt binding. The foot bottom has three different levels. The right-most level is the lowest, and is meant to ride on a single layer of fabric. The center level is highest. This keeps your folded fabric in place. The left-most level is meant to ride on two layers of fabric. These levels are what will keep our quilt in place.
Now, on to the part you’ve been waiting for:
The Tutorial
This is not a “quick” way to bind, but it is an easier way to get a quality binding on your quilt.
These instructions are for binding a quilt with a low loft batting, such as Warm & Natural. I haven’t tested this method on thicker battings, but I would assume that you would need to cut your binding slightly wider to accommodate the extra thickness.
- Trim all the layers of your quilt. If you do not have quilting up to the edge, you may want to do a stay stitch around the outside edge to make sure everything stays straight and square. This is a precision binding technique.
- Make your binding. For this method, I cut my binding at TWO INCHES. Please trust me on this. If you cut it too wide, it will not work properly. You may use either bias binding or straight cut binding.
When joining your binding, join the ends at an angle to reduce bulk. - Press your binding in half lengthwise, so you have a one inch strip.
- Set your machine needle as far left as the flat fell foot will allow.

- Sew the binding to the top of the quilt with the raw edges facing the right side, using the flat fell foot to guide the edge of the quilt and binding. Everything will be underneath the flat fell foot at this point.


- To turn corners, stop ¼” away from the corner, back stitch, and remove the quilt from the machine. Fold your binding to the right, forming a triangle over the stitching. Then fold the binding back to the left, lining it up with the next side of the quilt. Pin.
- Sew the next side, starting from the edge.
- Continue like this until you have sewn the binding completely to the front of the quilt.
- Press your binding to the outside of the quilt.
- Move your needle slightly to the right. (I move mine two positions.)

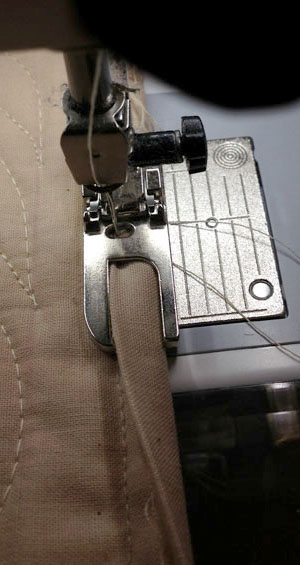
- This is where the magic happens. Working from the back side of the quilt, fold a portion of the binding over and put your needle down into all the layers.


- Lift your presser foot, with the needle still down, and pull the edge of the binding up so that it lies above the small inner edge of your flat fell foot. The right edge of your flat fell foot will be resting on the machine bed.

- Lower your presser foot and sew, making sure to keep your fabric against the inner edge of the flat fell foot, and gently folding the binding as it goes toward the foot.


- When you near a corner, fold the binding of the oncoming side up and pin in place. Stitch up to the corner, adjusting the binding in the binding foot to make sure it stays in place. Use a stiletto or a seam ripper if you have to. If you prefer to avoid this, you can also pin both sides of the binding in place, then place all layers of the quilt and binding underneath the foot as you sew to the corner.
- Once you reach the binding on the next corner, keep your needle down and rotate the quilt to sew the next edge. All the quilt layers, including the binding, will be under your foot at this point. Sew a few stitches and then, needle down, lift the presser foot and bring the binding up over the top of it again so that you can continue the way you did in step 12.

- When you reach the end of your binding, simply lift your foot, pull the binding underneath, and sew until the end.


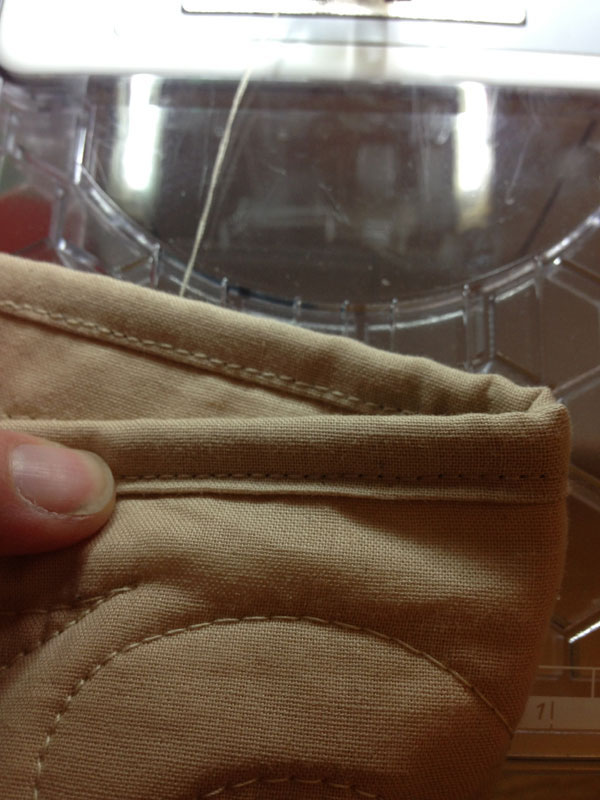
When you’re finished, you should have a beautiful binding with no hand sewing.
Happy Binding, and let me know how this turns out for you!

 Everything About Wool Felting
Such an awesome tutorial. I am going to look at all the various feet I have with my machine to see if I have one. (not a Berina — 😦 ). If I find one, I will try it on some mug-rug samplers before trying on a quilt~!~ Thanks.
Thanks! Make sure you get a wide fell foot. Mine is 8mm. It’s a good idea to practice on a small project. Also, if you use thicker batting you may want to practice with a chunk of that, first, too. Let me know how it works for you!
doesn’t the 2 inch produce a very narrow binding – i too do not have a bernina but will check the pfaff feet for something similar. thanks for the tut. it was very clear!
The binding turns out to be about a quarter inch. It’s actually tighter than your average binding.
Your second line of stitching is a touch closer to the edge of the quilt to ensure catching the binding edge on both sides. Since you know that you have your binding sewn securely, in this case, precisely 8mm from the quilt edge, moving your needle one or two mm toward the edge is nothing to worry about. It will catch all the quilt sandwich layers, as well as all six layers of binding. That’s a lot to hang on to!
The width of the binding is determined by the width of the felling foot. If you have more folding over onto the top than the width of the felling foot, it will crease at the area near the needle, and you will have a wrinkly edge with your seam going through the wrinkles, preserving them for all time.
By no means is this project a Bernina-oriented one! I happen to own a Bernina and two vintage Singers, and this was the brand of flat fell foot I could find locally. This is a very old fashioned foot, to make a seam that has been used for (I think) for at least a hundred years.
I hope this makes sense. Let me know if you have more questions.
How big of an issue would it be to do on the vintage Singers? I don’t have a Bernina but I do have vintage Singers. I know the needle won’t move but that’s the only issue I see (having never completed a quilt.)
I am going to go dig into my feet I have … Rarely do I change my feet … I will look for this one : ) Love the tut .
Gorgeous tutorial. Thank you for your clear and complete instructions and pictures.
worth a try! Tho I actually LIKE binding by hand! I wonder could you get a wider flat fell foot… I will look at the Long Beach Show. Thanks.
Thank you so much for that very clever idea!
I LOVE this tutorial. Where did you find your presser foot?
Anita
I can only get a 6mm Foot for my Pfaff. Any ideas for using it instead of the larger 8mm for the Bernia?
That is so great. Can’t wait to try it if I can ever finish this quilt!
LIsa – question for you – I have vintage singers, which have NO ability to move to the needle in any direction. A 6 mm. flat fell foot is available for the vintage singers. Would this technique be the same in these circumstances? How would you approach it knowing you cannot adjust the needle in any direction for vintage singers? I do have a bernina, and will first try on that machine using a 71 foot, but I’d like to know how this could be achieved on a vintage machine that does not have any needle movement ability.
Thanks so much!
Great tutorial – thanks. I’m having a problem finding a foot for my Singer. Any ideas?
Where did you get your 8mm foot? I’m looking around and just finding 4mm.
You are a genius! Thanks for the tip!
Great idea! My pfaff felling foot only comes in 4.5 or 6.5mm. Has anyone made binding with these and have tips on the binding size adjustments?
Thank you, this would be such a time saver and looks so neat, I’ll try it on my next project. Thank you for taking the time to give such great instructions.
Thank you so much and learn now, best show.
Thank you soooo much! I hate hand stitching. It is time consuming and as I have trouble using a thimble I always end up with holes in my finger tips. I do have Berninas so I am off to buy a foot today!
Genius! I can’t wait to give it a try.
Thank you so much for the clear explanation, the photos and for sharing this information. I’m off to buy the foot from my local Bernina. I love the finish that the flat felled seam foot gives.
Thanks for the great tutorial. It may not be Bernina-oriented but I am. I only want to add that for me it is a great help to serge a quilt before binding. This keeps the raw edge tidy and flat, so it is a good start before trying your binding method. Thanks again!
I have been looking for a flat fell foot for years, where can I find one?
Wholly Macarroni!,,, I have this foot who would have ever thunk it. I have been ripping a nd sewing the binding on a wallet for a week. Tempted to jump out of bed to the studio jusst to try it… So excited! I am a follower for life now
I wasn’t looking for this tutorial, I was actually looking for something to show how to sew bias along an apron hem. But I’m so glad I stumbled across this tutorial! I’ve been dabbling in quilting for the last few months and of course I prefer the machine sewn bias as I just hate hand sewing. Unfortunately it never looks as perfect as I want it to. THIS has given me hope! I will be searching out this foot, especially since my husband gave me a new Singer Heritage for Christmas and I want to use it as much as possible. Thanks you ever so much for this tutorial.
This is a really really GREAT tip! Thank you
Where did you get an 8MM foot??? I have a Brother Duetta 4500 and can only find a 6MM. Please help!!
Thank you so much for this tutorial!! Now I just need to get the foot and be on my way!!
This is now my go-to method of binding. Very quick and effective. I think it is more secure too. Thanks.
I HAVE THAT FOOT!!!!!! I will definitely try this! Thanks so much for the tutorial!
I can’t wait to try this…thanks for the tutorial!
Thank you.
Can a machine with a maximum stitch width of less than 8mm cannot use this presser foot? My Bernina Activa 240 is a little workhorse, but it has a maximum stitch width of 5.5mm.
This is something different. Thanks for sharing a great tutorial. I recently came to terms with machine finished binding. I just don’t have time to hand finish binding on charity quilts. I apply my binding to the trimmed quilt from the back, this way I know exactly what’s going on with the finishing on the front.
Excellent tut and very clear-thank you! I am confused on one thing-how/when do you join the ends of the binding using this method?
My pfaff 362 has a wide flat fell foot and it will fit the low shank singers. Might give it a try..Dee in okla
How do you join the two ends of your binding? Did I miss that step? Please answer as soon as you can! I need to do this today!
Love this, thanks for passing on the information!
Great idea and tutorial….off to get the flat fell foot. THANK YOU!!!!
This is great. I have been a longarm quilter for 12 years and do about 3 machine bindings a week. That’s a lot of bindings over 12 years. I decided to give this a try right on a customer quilt, no practice pieces for me. To top it all off this was a black binding on a light grey top and back, any little wobble would show. It came out perfectly. Thanks so much for the tutorial.
Funnily enough, hand stitching the binding is my favorite part! ^^; It’s the most relaxing and rewarding part for me haha. But I really want to try this in the future! I’ll have to keep my eye out for that foot. =)
Funnily enough, hand stitching the binding is my favorite part!! ^^; It’s sooo relaxing to me haha. I do want to try this out in the future though, nice, quick, and neat!
Can you explain more about how you end this binding? I assume you overlap the beginning with maybe a 1/4″ of the end tucked under. Does this get too thick for the foot to handle?
Where did you get the foot to
Bernina feet are only available from a Bernina dealer.
Anna, Thanks so much, appreciate your taking the time to post this. Sandy Van Hee
Where did you find this foot? I can’t find it on Amazon.
You can only get Bernina feet from your Bernina dealer.
The problem with this is the Bernina foot only works for their machines. The other machines don’t have the 8 mm flat-felled foot. I had a Juki and a Janome machines.
Sent from my iPhone
>
I did not realize when I wrote this tutorial that Bernina made the only 8mm flat fell foot on the market. What do people use on their jeans?
They have smaller than 8 mm. I have never done jeans.
Sent from my iPhone
>
Viking makes one for their machines, but it is 9mm rather than 8, so Viking owners will have to experiment with how wide to cut the binding.
This is very good to know! Thank you. 🙂
Thank you so much for the tutorial. This technique makes the nicest binding.
I tried this technique and it did not work for me! I used a two inch binding and low-pile batting.
Thanks for the tutorial. I realise that they are a lot of work to produce. I would have enjoyed it more if you had shown a sample using different coloured fabric for top, back and binding. Because you used the same colour in all, I could not tell which was the top or back in your final picture. I have not tried this as I do not have the foot, but looking at your instructions it has occurred to me that the final seam may have a better appearance than the first. Hence it could give a better result with the binding sewn to the back first and finished on the top. Have you tried this?
Any advice for those of us that still have the old Berninas (1230)? Is there a foot that can be purchased for them that will do this?
Thank you so much for the tut! I’m going to try it tomorrow on a baby quilt that I have to finish. I guess it will be trial by fire.
I just bought a 9mm flat fell foot on Ebay for $18.00 free shipping. It is for all Viking. I found some of my feet from my HVTopaz 20 fit my two Singer machines . The snap on ones and visa versa. I hope this one will work on the Singer too. If not then will use the Topaz with it.
This is a great tutorial….I will have to give it try. Thanks.
I love you and may have to marry you for this! I will be ordering my foot right now. Soooo hoping this will work but it looks great on your pictures.
Only thing I will probably change is sewing the binding to the back then folding over to the front.
(I do that now too with my all machine technique. Only I make my binding extra wide, sothe second stitchline will fall next to the binding on the back, like obviously 1/16th away from it). But this does open new possibilities!
Thank you so much
If you have a Pfaff, this is called a ‘rolled edge’ foot.