
If you’ve made even one quilt, you have narrow strips of batting. Sometimes they’re just shy of the size you need for a wall hanging, purse, or anything else.
WHAT TO DO?
You can join these pieces of batting together without lumps or flat spots, using your handy dandy sewing machine!
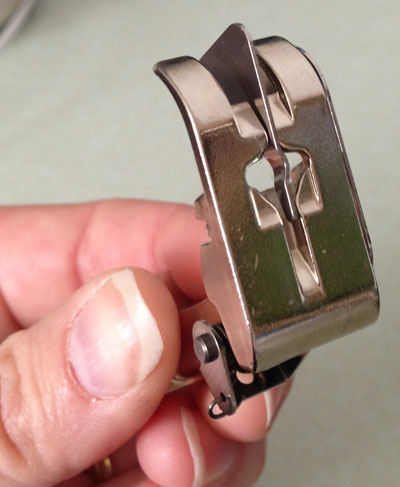
For this tutorial, you need a sewing machine that does a zig-zag stitch, and an edge joining (or stitch in the ditch) foot. If your machine is a Bernina, this is foot number five. They call it the blind hem foot. What’s important about this foot is the blade running down the middle of the foot. This is what will help us join our batting pieces.

1. Trim your batting pieces so that they are straight and even. Note that most batting has two different sides. Keep the like sides facing up to ensure that your batting will behave consistently during quilting and washing.

2. Adjust your machine stitch to zig-zag as wide as your foot will allow, and as long as your machine will allow. This will make a very loose stitch.
3. Place the two pieces of batting side by side, meeting at the blade in the center of the foot, and zig-zag the pieces together. They should not overlap! If your stitches are too tight, loosen your top tension to keep them from bunching the batting together or compressing it.

Your stitches will usually not be very attractive or sturdy, but that is okay. All we want is to help these batting pieces stay put until we are done basting and quilting. This should be enough.

If you try this, let me know how it works for you!

 Everything About Wool Felting
Thank you! Now I know.
You’re welcome, antarabesque!
I’ve used this technique with a slight variation. Instead of butting the two batting pieces together, I lay them out overlapping the long edges by about 3-4″. Along the length of the overlapped area, make a gentle wavy cut through both thicknesses of batting. You will have two skinny wavy strips of wasted batting. Sew the larger batting pieces together as described in this post. This method creates a join line that won’t want to pull apart if the quilt was ever folded along that seam. I think that’s a fair exchange for the small loss of batting that is wasted.
This is an excellent recommendation. This method would likely ensure that the batting join does not fall between quilt lines. Thank you for sharing this!