
 This is my first attempt at creating a coat out of felted, reconstructed wool sweaters. It was also one of my first serger creations. Who but me would go from scarves directly to the challenge of a giant, sweater coat? It turned out pretty well. I nicked a spot in the hood with the serger knife and learned a lot about cutting open seam mistakes and a lot about the minutia of serger settings. This was my self-inflicted crash-course in serging. Lisa is also a huge help. She gets an almost-daily sewing question from me. I’ve been wearing it everywhere–even Nordic skiing and snowshoeing–and my seams show no evidence of wear. The best compliment I’ve gotten so far was from the proprietor at our local yarn shop, “You’ve done a very professional job and I know. I’m a seamstress and fiber person.” Yay!
I was inspired primarily by Katwise’s creations. As a dancer, I’d taught myself years ago how to make gored skirts and dresses for dancing so I had a pretty good idea how to construct the coat but had some questions. I purchased Katwise’s “Upcycled Sweater Tutorial” hoping that it would help with details. The tutorial is creatively put together, but if you already have some experience with felted fibers and serging, it probably isn’t going to answer the detailed questions that you have. Images of her creations were probably the most helpful hints. Her tutorial wasn’t that expensive though so I’d say it was worth it.
I’ve made two coats since this one and sort of have a method down now. One of my primary challenges is finding enough sweaters that go together to complete a coat. Finding wool sweaters of substance has been a real challenge. By the time I get to the finishing touches, I’m scrounging for scraps. For instance, I’m not that happy about the color or the material the belt is made of but, alas, it was my only choice. The fringe along the bottom also came about because all I had left were scraps and the skirt of the coat needed to be longer.
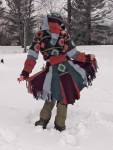


The way the materials dictate the design is also one of the things I like about the construction method. I hadn’t intended to create a garment that somewhat replicated the Native American capote (or Mackinac) worn in Canada and the Northern US but the materials combined with my cultural background produced a happy surprise.
This is my basic method for constructing the bodice. I’ll continue to give tips in subsequent posts. Find a felted sweater that fits the torso of the person who will be wearing the garment. This becomes the bodice. Now find about seven other sweaters that will go with this sweater. Set these aside for now. Cut the sleeves of the bodice sweater off about two inches above the elbows (The sleeve remnants will eventually get used in the lower part of the sleeves, hood and pockets.). Cut the bottom of the sweater off just above the natural waist (This will most likely get used in the hood.). Cut the neck binding off (These are hard to find uses for.). Cut the bodice up the center front.
Now to fit the bodice, I put the it on my dress form or the person who will be wearing the coat. The dress form is easier since you can stick pins in it without it squealing in pain. I find I often have to add a gusset in the armpit area of the bodice to make the shoulder area and sleeve opening large enough. I want to make practical coats that have enough ease to accommodate another sweater underneath.
Now, for the closure. I find that closure design is one of my biggest quandries. I haven’t yet thought of an efficient way to do this that doesn’t involve purchasing un-recycled materials. But…hopefully one or two of those sweaters you set aside has a button placket with big buttons or a well-functioning zipper that will be long enough to close the coat from your throat to about halfway between your knees and your crotch. People seem to want zippers but I, personally, think the buttons are more fail-proof. You just have to be more patient and so do all your friends who wear conventional clothing as they wait for you to get your fabulous coat on. Seriously, it takes less than a minute. Just be patient…all of you. Now, you’ll want to cut the chosen closure out of the sweater and pin it to the bodice in such a way that it conforms to the shape of the body. Now it’s time for the waistband.

 Everything About Wool Felting